The advantages of underfloor heating (abbreviated as TP) over conventional batteries are well known. Therefore, many owners of apartments and private houses want to make floor heating circuits, and heat transfer from the existing radiator system.
Here a number of difficulties arise - it is necessary to mount and correctly connect the underfloor heating water to keep the water temperature in the hinges within 55-60 ° C. But the first task is to verify the technical feasibility of laying the “pie” of the transformer substation and connecting it to existing highways at the lowest cost.
How to fit a “pie” in a room with low thresholds
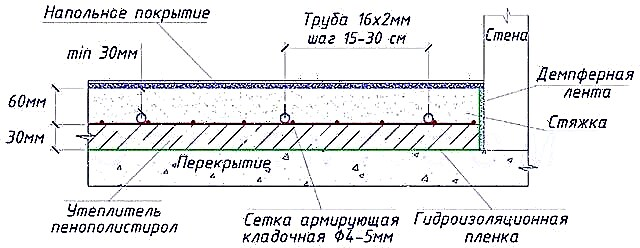
Almost all homeowners who have decided to arrange underfloor heating in an old house or city apartment face this problem. The essence of the issue: the height of the thresholds of the entrance or interior doors is not enough for the installation of a full-fledged “cake” of warm water floors with a screed (see the drawing below).
We will analyze the composition of a monolithic heating circuit located on a floor or basement:
- Waterproofing - bitumen coating, more often - a plastic film.
- Insulation - extruded polystyrene foam with a minimum thickness of 30 mm or polystyrene 5 cm.
- Damper tape around the room.
- A heating pipe (usually metal-plastic or cross-linked polyethylene with a diameter of 16 x 2 mm), laid by a snail or a snake.
- Cement-sand screed 8.5 cm thick.
- Floor covering (sometimes a vapor barrier is made underneath). The thickness depends on the material, the laminate and linoleum will take up to 1 cm, ceramic tiles with adhesive mixture - about 20 mm.

An important nuance. If a monolithic heated floor is located above the ground, the thickness of the insulation increases to at least 100 mm of foam or 60 mm of extrusion foam. The density of both materials is 35 kg / m³.
Total total height of the “cake” with a coating of laminate will be 85 + 30 + 10 = 125 mm. Such high thresholds are not provided by any normal owner. How to solve the problem and realize floor heating in a similar situation:
- Dismantle the existing screed to the very base - soil or floor slab.
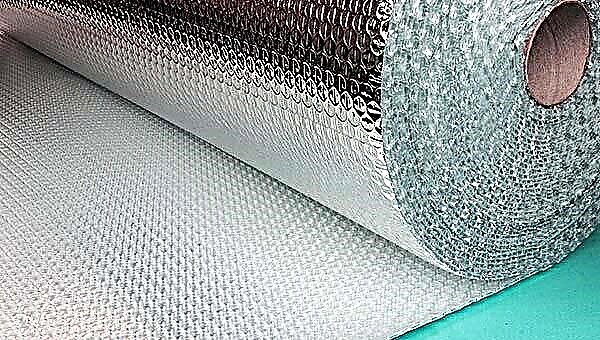
- Instead of a heat-insulating layer of polystyrene, use a multifoil up to 1 cm thick.
- Reduce screed power to 60 mm. The structure will have to be reinforced with masonry or road mesh sizes of 150 x 150 x 4 and 100 x 100 x 5 mm, respectively.
- Use flooring systems - “dry” warm floors, mounted in wooden houses without screed. The total thickness of the “pie” is 6-10 cm.
- Heat the floor with an electric carbon film instead of the water pipe system.


Reference. The only room of the apartment, where the thresholds remain high, is a balcony and a loggia. There is no need to reinvent the wheel there; usually a monolith fits freely with thermal insulation.

Some homegrown craftsmen do not put insulation at all or reduce the thickness of the screed to 4 cm. In the first case, half of the heat released will go to the basement, soil or to the neighbors below, in the second, the monolith expanding from heating will soon crack.
Central heating connection
According to the legislation of the Russian Federation, the Republic of Belarus, Ukraine and other countries of the former USSR, unauthorized interference in the district heating system is prohibited. Simply put, for connecting additional heating appliances and underfloor heating, a large fine is threatened and the order to dismantle unnecessary heaters.
Note.Similar measures and responsibilities are foreseen for connecting the TP to the centralized hot water supply network (DHW).
How an unauthorized connection from central heating is detected:
- neighboring apartments receive less heat, residents start scribbling complaints, a commission from the management company reveals your modernization;
- due to pressure surges or poor-quality installation, a breakthrough and flooding of the lower apartment occurs;
- responsible persons note a large difference in the readings of a common house meter and apartment heat meters;
- if you connect the contours of the warm floor in series with the batteries, the hydraulic resistance of the entire branch increases, the duct decreases, in apartments this colder becomes colder.

Some “tricks” advise connecting TP loops through a plate heat exchanger in order to isolate the circuits from central heating. Trick: the hydraulic resistance of the network will not increase and a break in the pipe will not cause serious flooding, but the amount of heat removed will still increase.

How to make floor heating the legal way:
- Contact the heat supply organization with a statement and get permission.
- Together with a permit document, obtain technical specifications for the installation and connection of floor circuits.
- Develop and coordinate a project.
- Mount the system yourself and put it into operation.
Admittedly, the vast majority of applicants are refused at the appeal stage. An exception is made for residents of new buildings with individual connection of apartment heating to distributing risers. But if you decide at your own risk to embed the heating circuits into the heat supply network, proceed to the next section.
Connection options
To ensure the normal operation of the TP circuits and get the long-awaited feeling of comfort, 2 issues need to be addressed:
- Supply a coolant with a temperature of not higher than 50 ° C (maximum 55 ° C) into the pipes of the heating circuits. Overheated floors cause discomfort for most people, the optimal indicator for the finish coating is 26 ° C.
- Ensure the required coolant flow in radiators and floor heating loops. If the diameter of the supply line is too small or the circulation pump does not develop the required capacity, the batteries and underfloor heating will start to heat equally badly.

Consider several schemes that allow you to connect a water floor heating to an existing heating system. Let's see how well the issues of temperature and coolant flow rate are solved in each option:
- direct connection to a two-pipe radiator network;
- the same, with the use of regulatory thermostatic heads;
- insert into the main line of a single-pipe system with an additional pump;
- full connection with a separate pipe from the boiler.
Direct connection to the radiator network
The insertion of the TP circuit into the supply and return of the two-pipe wiring will tolerably function under the following conditions:
- the total heated area is relatively small - up to 100 squares;
- heat source - a gas boiler capable of maintaining the temperature of the coolant in the range of 40-50 ° C;
- the circulation pump installed in the boiler room has sufficient performance;
- warm floors are designed to heat small rooms - bathroom, kitchen, nursery.

A direct connection scheme has the right to life, but in general is very imperfect. Judge for yourself: it is much easier for water to move along the path of small resistance further along the highway than to flow into a long heating circuit pipe.
The second moment: when severe colds occur, you yourself will raise the temperature in the boiler, the floor surface will heat up, it will become stuffy in the room. The tiled bathroom will turn into a bathhouse. Note: intensive heating of the bathroom is completely useless, people are not there all the time.

For reference.As some home craftsmen still do: include the circuit of the TP in the gap of the return line, going from the batteries to the heat source. And then they wonder why the warm floor does not work together with radiators. The reason is an increase in the hydraulic resistance of the entire branch and a decrease in the coolant flow rate.
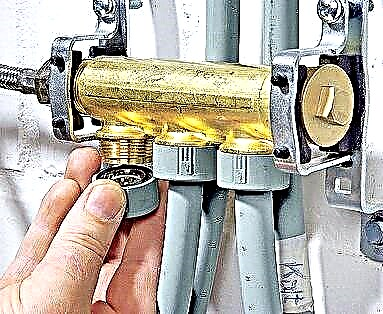
Using RTL Valves

Correctly solve the issue of regulating the water temperature when connecting a warm floor will directly help special RTL thermal heads. The automatic valve is placed on the return pipe and is easily adjusted to a specific temperature. The operation algorithm is as follows:
- Until the heating medium reaches the value set on the thermal head, it quietly circulates through the pipe of the floor circuit.
- When the water temperature rises to the set value, the head actuator closes the thermostatic valve. The circulation stops, the coolant cools.
- After the temperature drops as a result of cooling, the thermostat opens the passage and the movement of water resumes.

Reference Information. The European company Oventrop has long been offering solutions for such cases - UniBox units built into the wall. Inside there is a RTL type thermal head, the adjustment knob is brought out. There are versions with two valves - one controls the flow of the coolant according to the return temperature, the second - by heating the ambient air.
The disadvantage of this solution is the limitation of the length of the pipeline. If the length of the loop exceeds 50 m, the TP will begin to work unevenly due to increased resistance. To heat rooms of medium and large areas, it will be necessary to split the warm floors into 2-3 circuits and the same number of monoliths separated by expansion joints, as shown in the drawing.

Now about the pros:
- heating with underfloor heating can be arranged in any room, without being tied to the boiler and furnace;
- the price of the product is not comparable with the cost of mixing units and additional pumps;
- if the batteries are equipped with air thermal heads, the TP system will be able to work in the summer - the radiators will turn off themselves.
Can I connect to a single pipe wiring
To energize underfloor heating from heating - a favorite of many masters of the one-pipe "Leningrad", you will have to assemble the mixing unit with your own hands and put in a second pump, as shown in the diagram. For the normal functioning of the system, the following conditions must be observed:
- the inner diameter of the distribution line is at least DN25, the maximum number of radiators on the ring is 5 pieces;
- the connection of the TP loop is done in the return pipe after all the batteries;
- the minimum distance between the feed and return of the underfloor heating is 30 cm;
- To maintain the temperature in the circuit, a three-way mixing valve is installed.
Note. A similar scheme is used by the owners of apartments for unauthorized connection of TP to the central heating of the old type - single-pipe vertical risers.

The three-way valve is a simplified design, capable of preparing water with a fixed temperature of 45-50 ° C. The pump “drives” the coolant in a loop, and the valve mixes portions of hot water from the main line.
In practice, the scheme is used quite rarely. The reason is the instability of work and the imbalance of radiators connected to a single Leningrad pipe. When the three-way valve opens and energizes the heating circuit, the pump pressure is transferred to the main line, the water flow in the batteries changes.
Tip. If you want to assemble a reliable scheme of underfloor heating with your own hands, it is better to conduct separate pipelines for supply and return from the boiler. The consequences of perversions with a one-pipe radiator network are unpredictable.
Traditional mix knot
When it is necessary to arrange floor heating in each room of a two-story house, it is impossible to connect to the existing radiator heating.It is necessary to lay separate pipelines and install a distribution comb. What connection options are practiced:
- if the length of the circuits does not exceed 50 m (including connections to the collector), thermal heads are placed on the comb that respond to the return temperature;
- mixing unit with manifold and two-way valve;
- the same with a three-way thermostatic valve.

In the first case, the principle of operation is similar to inserting one loop through the RTL head, only the regulators are on the comb and control each circuit separately, as is realized in the photo. Circulation is provided by the main pump located in the furnace or inside the wall-mounted gas boiler.
In the second embodiment, hot water is mixed with a two-way valve mounted on the supply and controlled by a thermal head with an external temperature sensor. The latter is hidden in the pipe of the collector or screwed to it from the outside.

When the temperature of the supplied coolant increases, the liquid from the sensor flask presses on the valve stem and it closes. The scheme provides for the installation of an additional pump that pumps water through all the loops of the TP.
The scheme with a three-way valve, whose operating principle is described above, is more advanced and is designed for a solid coolant flow in warm floors. The disadvantage of both options is the decent price of the equipment and the complexity of installation. All details about comb assembly and methods for connecting heating circuits are set out in the corresponding manual.

Installation instructions for underfloor heating
If you have settled all the questions regarding the laying of the “pie” and choosing the connection scheme, you can proceed to pouring the heating plates. First, find out the necessary thermal power of the circuits, the diameter and the distance between the pipes, using our instructions.
Before installation, level the surface and carefully remove debris. When installing screeds on the ground, prepare a compacted sand cushion or concrete foot 4 cm thick. The technology for pouring a monolithic warm floor looks like this:
- Make waterproofing from the films of the film, laid out over the entire area of the room with an overlap of 100-150 mm. Glue the joints with adhesive tape, make edges on the walls up to the level of the future clean floor.
- Paste the bottom of the walls in contact with the screed with a damper tape around the entire perimeter, as shown in the photo. The puff of the waterproofing film should remain on top of the strip.
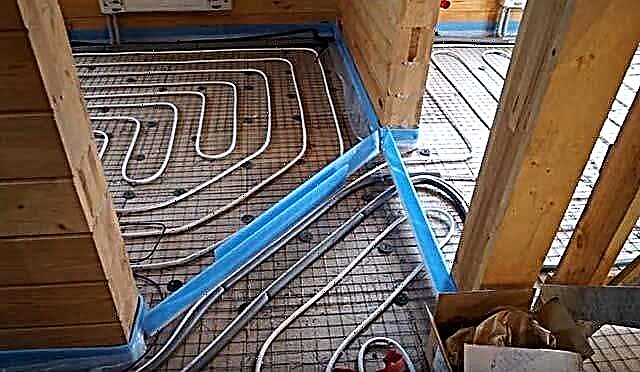
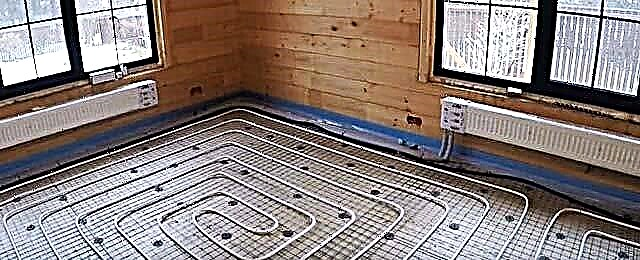
- Tightly lay the heat-insulating boards close to each other. Roll out the bay and straighten the pipe, spread out the loops of the heating circuits with the desired step. Fixation of the pipeline to the insulation is carried out with plastic brackets with an interval of 35-40 cm.
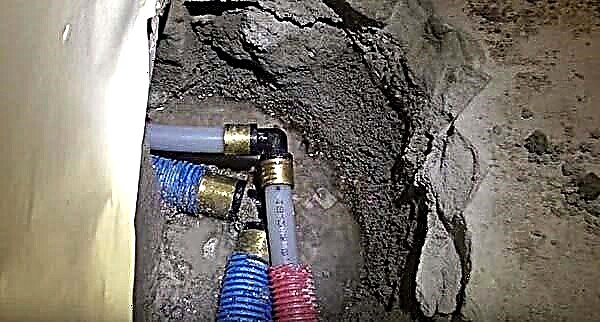
- Bring out the ends of the loops to the connection point - to the collector or to the radiator heating pipes. Before final assembly of the circuit, fill the circuit with water, expel air and check for leaks with a pressure of 3-4 bar.


Note. If you intend to fill in a thin screed (6 cm), lay a reinforcing mesh on top of the polystyrene plates. Do not connect pipes inside the future monolith, put only solid pipes without joints.
Leaving the loops filled with water (so that they do not float and crease under the weight of concrete), make a cement-sand mortar from the finished dry floor mixture and fill the screed. Continue work after approximately 4 weeks - as much as is required for complete hardening. The installation technology of a flooring system of underfloor heating without cement screed is described in detail in our other publication.
Conclusion
Listening to the opinion of plumbers and experts, we will finally give a recommendation: avoid connecting a water heated floor to the working heating branches. It is better to tie the heating circuits of the TP directly to the boiler, then the floor heating will be able to function independently of the batteries, including in the summer.The process of laying pipes and pouring concrete screed, see the last video.